How to Set Up System Locale on Ubuntu 18.04
Locales defines language and country specific setting for your programs and shell session. You can use locales to see date, time, number, currency and other values formatted as per your country or language on a Linux or Unix-like system.
In this tutorial, we will not only show you how to change the locale to whatever locale you need, but we will also show you various commands that allow you to see your installed locales, install additional locales, and more.
1. How to view system locale in Ubuntu 18.04
To view information about the current installed locale, use the locale or localectl utility.
$ locale
LANG=C.UTF-8
LANGUAGE=
LC_CTYPE="C.UTF-8"
LC_NUMERIC=C.UTF-8
LC_TIME="C.UTF-8"
LC_COLLATE="C.UTF-8"
LC_MONETARY=C.UTF-8
LC_MESSAGES="C.UTF-8"
LC_PAPER=C.UTF-8
LC_NAME=C.UTF-8
LC_ADDRESS=C.UTF-8
LC_TELEPHONE=C.UTF-8
LC_MEASUREMENT=C.UTF-8
LC_IDENTIFICATION=C.UTF-8
LC_ALL=
$ localectl status
    System Locale: LANG=en_US.UTF-8
       VC Keymap: n/a
      X11 Layout: us
       X11 Model: pc105
You can have several locales set for different parts of your system.
2. Check which system locales are enabled
By using the locale command you can see which locales are currently being used for your active terminal session. In the output above the system locale is set to en_US.UTF-8.
Before setting up a different system locale you can first check which locales are enabled and ready to use on your Ubuntu 18.04/18.10 VPS. You can use the following command for that purpose:
$ locale -a
The output should be similar to the one below:
$ locale -a
C
C.UTF-8
POSIX
en_US.utf8
3. Generate a system locale for the region you need
If you don’t have the locale that you need to be enabled on your system, it can simply be generated by using the locale-gen command. Just run the following command to generate a locale for the region you need:
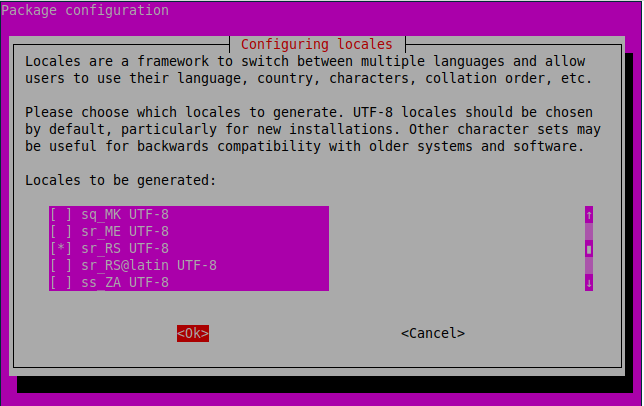
$ sudo dpkg-reconfigure locales
Select the locale that you want to be enabled and press OK. On the image below you can see that we selected sr_RS UTF-8.
Once you press OK you should see the following output:
Generating locales (this might take a while)...
  en_US.UTF-8... done
  sr_RS.UTF-8... done
Generation complete.
4. Verify is a system locale is enabled
This confirms that the locale you selected is generated and you can use it on your system. To verify that it is enabled you can run the locale -a command again.
$ locale -a
C
C.UTF-8
POSIX
en_US.utf8
sr_RS
sr_RS.utf8
5. Changing your locale manually
Editing the locale file is very easy. You can use your favorite text editor to edit the /etc/default/locale file. If this file does not exist, then no locale is currently set for your system. You can create one manually and enable a locale for your system. The output below shows how the file should look like:
$ cat /etc/default/locale
#  File generated by update-locale
$ cat /etc/default/locale
LANG=en_US.UTF-8
Replace en_US.UTF-8 with the locale you wish to have active on your system and save the file. Once you save the file, log out from your current session and then log back in, or open a new terminal, and your newly chosen locale will be active.
[box type=”note” align=”” class=”” width=””]This example file only sets the LANG variable for your system, which covers the locale for all parts of the system.[/box]
6. Changing your locale using the “update-locale” command
This is similar to the other method, but by using the “update-locale” command, we can easily update the file without having to edit it ourselves. Execute it as shown to change your locale:
$ sudo update-locale LANG=name_of_locale_hereThen restart your terminal, or log out then back in, and your newly-set locale will be active.
7. Changing the locale for specific parts of the operating system
Updating the LANG variable allows you to change the locale for the entire system at once. If you want to set up the locale for a specific part of the system you should edit the appropriate variable. Here are a few useful variables to know:
- LC_MESSAGES – Sets the language for system messages.
- LC_RESPONSE – Sets the language for dialogs shown on screen (e.g. “Yes” or “No” dialogs).
- LC_NUMERIC – Sets the format for numbers depending on the region (e.g. decimals and commas being switched in some countries).
- LC_TIME – Sets the format for the time and date.
- LC_COLLATE – Sets the alphabetical order for strings (e.g. file names).
- LC_MONETARY – Sets the currency name and symbol depending on the country.
- LC_NAME – Sets the format for names (e.g. last name displayed before the first name).
For more information, see the locale, update-locale and localectl man pages.
$ man locale
$ man update-locale
$ man localectl
That’s all! In this short article, we have explained how to view and set system local in Ubuntu 18.04 Linux. If you have any questions, use the feedback form below to reach us.
