


We may receive a commission when you use our affiliate links. However, this does not impact our recommendations.
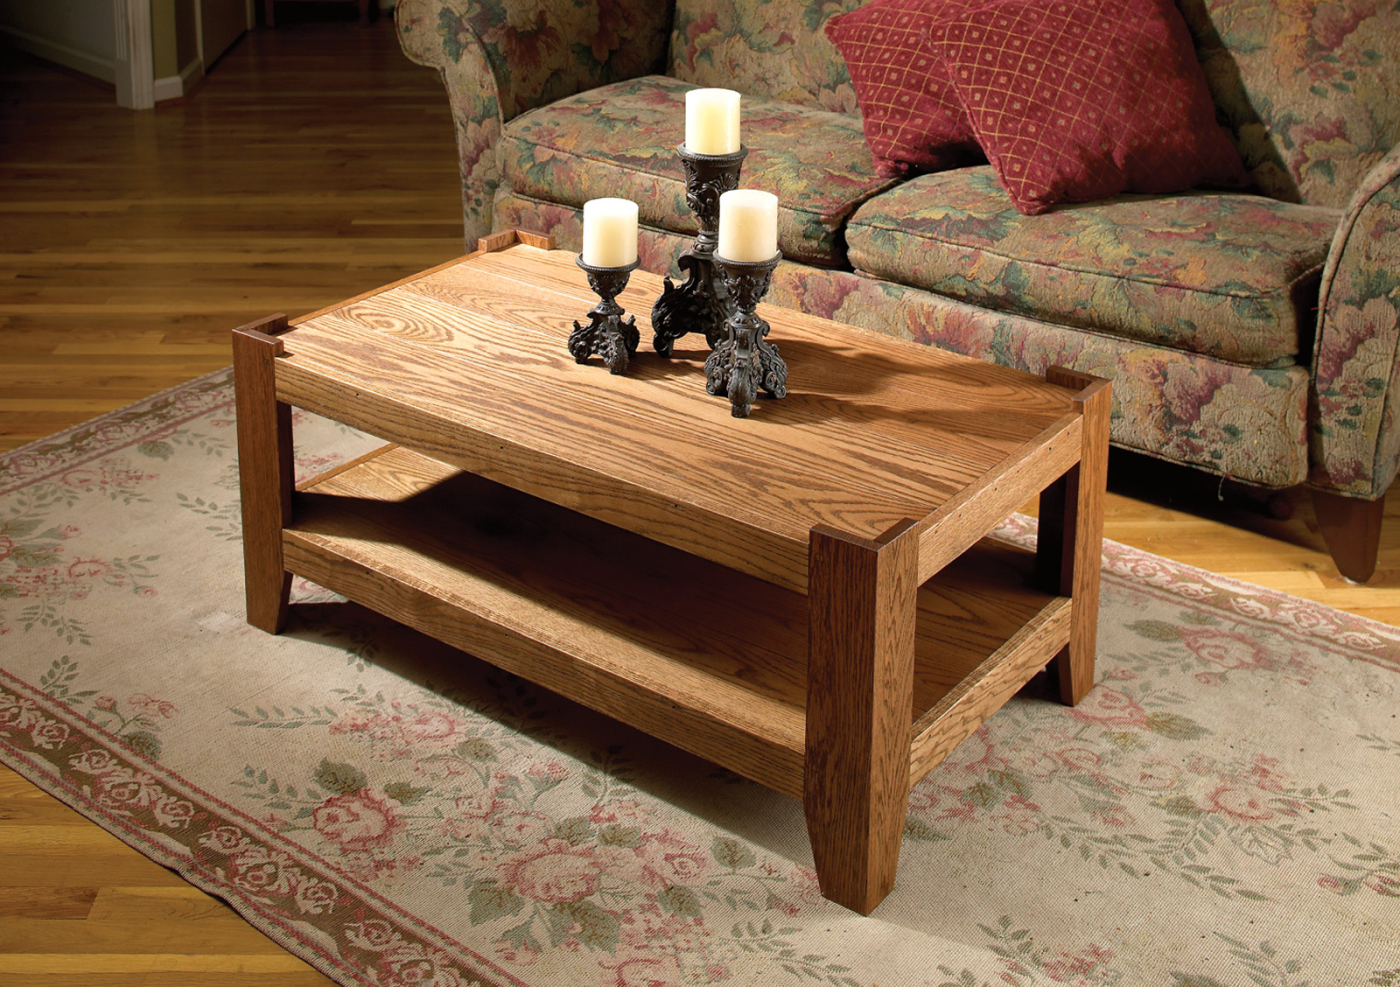
Living-room centerpiece. A solid and handsome coffee table is an integral part of a comfortable living room. This one, in red oak, is simple to make with just a basic set of tools.
Uncomplicated construction and an easy, attractive finish make this table tops.
The construction of this handsome red oak coffee table is uncomplicated. The top and shelf units are made of four individual pieces of lumber. Each leg is two pieces, attached to the top and shelf with screws. Add in the pieces that put the finishing touches on the sides and ends and this coffee table is ready for a finish.
For Basics Week we’re presenting a special offer on our PopWood+ membership, where you can save 25% off your first month or full year when you use the code BASIC23 at checkout.
Making the Top and Shelf
Construction begins with the top and shelf pieces. Each of the two identical assemblies is made of four pieces of 1×6 stock cut to length. Knock off the sharp edges with sandpaper or a block plane. Position four of the top/shelf pieces on a flat surface (best face down) and align the ends. Add clamps to help pull the pieces tightly together as well as to keep things from shifting as you attach the battens.
The battens are 21 3⁄4” lengths of 1×4. Center one batten, then position the other two 2″ from each end. Drill countersink holes, then attach the battens with one screw (#8 x 11⁄4“) in the center of each of the 1×6 pieces.
Repeat these steps for the second assembly then set them aside.
A Leg Up
Cut the leg material to size and set four of the pieces to the side. The remaining four pieces need to have 3⁄4” taken from one long edge. Mark the cutline and jigsaw as close to the line as possible without crossing. Use a block plane to square the cut edge to the line.
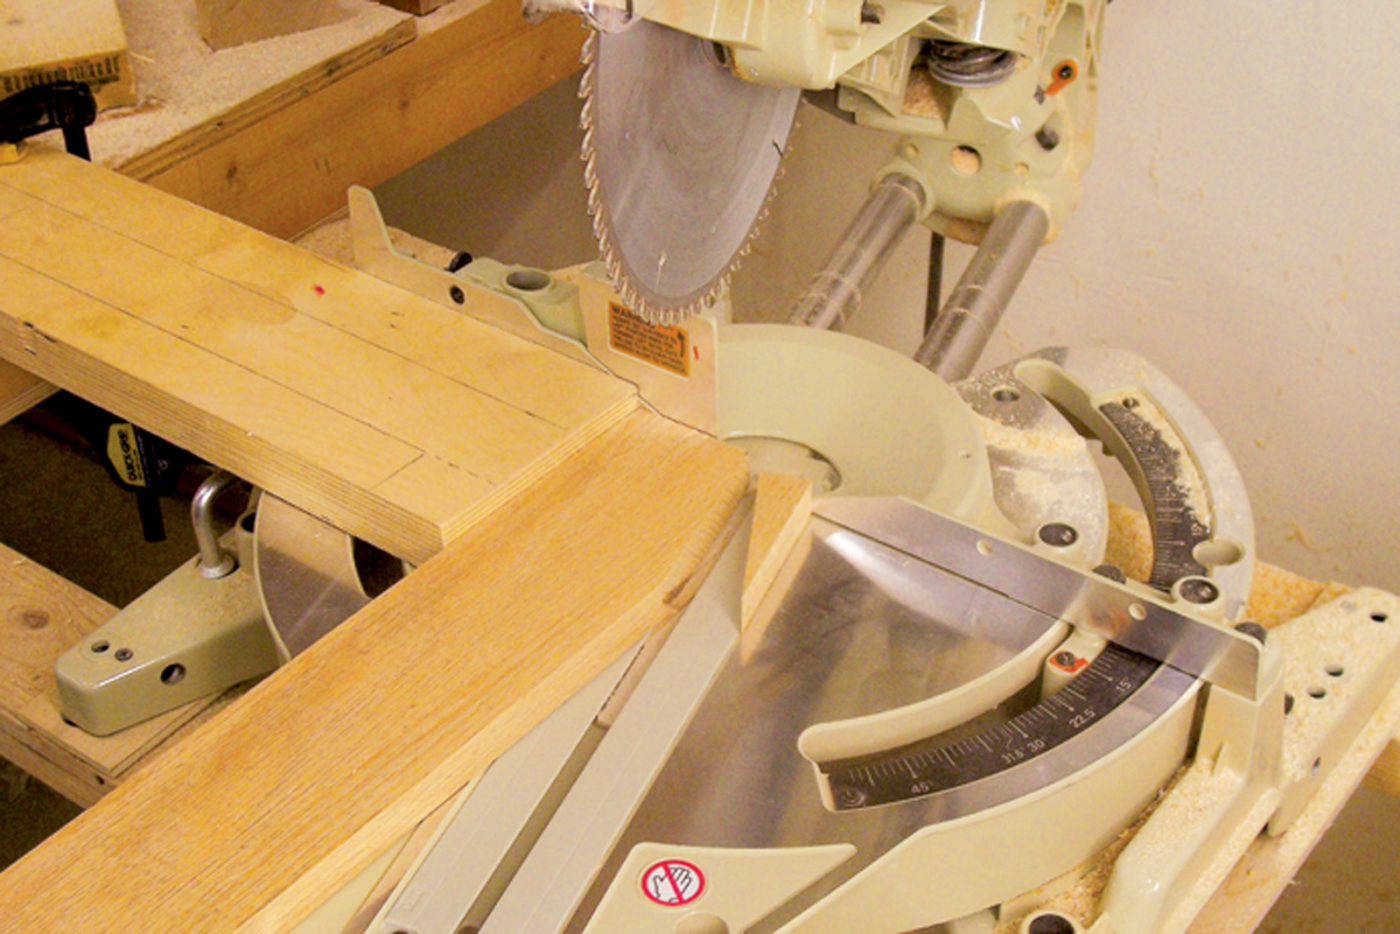
The right angle. The setup shown above allows you to create the beveled feet with a miter saw.
I made the angled foot cuts at the miter saw, though they also could be made with the jigsaw and cleaned up with a block plane. On a miter saw, you can’t set any angle past 45° or so, and so we need to base the cut off of the 90° setting. Position the saw to cut a 15° angle, set a temporary stop and set the cut to leave 21⁄8” of stock at the bottom edge of the leg. Make the cut on the four full-width pieces, then set the stop so the cut is at 15⁄8” on the pieces that were ripped to 3⁄4” less with the jigsaw.
Add glue to the long edge of the narrow blanks and clamp the leg assembly together. Repeat the steps for each pair of leg blanks and set the legs aside to dry.
Time to Assemble
Position the top with the face down and raise the unit off of the bench with a couple 3⁄4” scraps. Next, position the shelf so it hits the legs 31⁄2” above the terminating point of the angled cut. I found that two stacked soda cans at each corner worked great to hold it in place while I set the clamps.
Set the cans at each corner and position the shelf, face down, on top of the can supports. Next, position the legs at each corner and add a clamp to each side. Once the clamps are in place, mark the location of the top edge of the shelf as it hits the legs (to position the shelf after removing the cans).
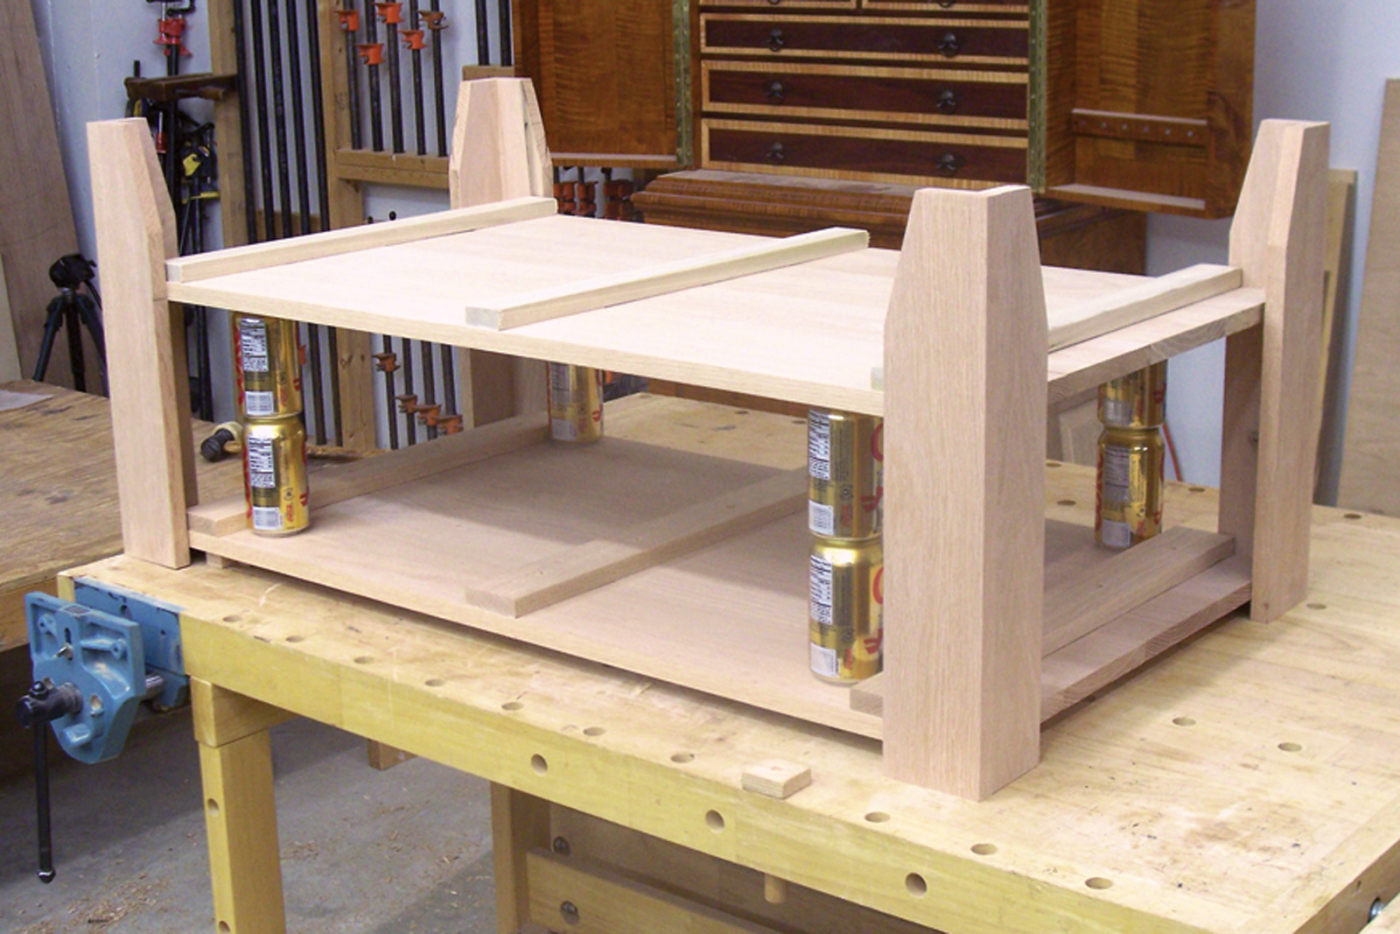
Squared up. Everything may be in position, but if your table is not square to the flat surface, you will find it extremely difficult to add the finishing pieces to the table.
Loosen the clamps slightly and slide the shelf upward. Remove the cans and tighten the clamps while repositioning the top at the marked lines. Do the same for the opposite end, and you’re ready to attach the legs to the top and shelf.
Before joining the two, make sure that the entire table is flat on the bench. Tapping the unit with a rubber mallet or a hammer and a block of wood can make slight adjustments.
Drill pilot holes with a combination pilot hole and countersink bit. Then drive #8 x 11⁄4” screws through each leg and into both the top and the shelf. Each leg will have a total of eight screws installed.
Before the clamps are removed, cut and fit the rails that complete the sides and ends. A snug fit is required. Use a pocket-hole jig and bit to drill a hole at the lower edge of each of the rails. After the pieces are fit and readied for the screws, attach the rails to the leg assemblies with the recommended screws.
Drive nails into the side rails, three per side, and through the end rails into each piece that makes up the top and shelf. Two nails per end piece – 1⁄2” from each edge.
Use a drill bit or begin the hole with the nail itself in the drill. The nails will allow for seasonal movement and help keep the wood flat because as the lumber moves, the nails will bend to and fro.
The countersink part of the drill bit leaves room for a 3⁄8” plug. These plugs can be purchased from the supply store, or cut from scrap material with a matching 3⁄8” plug cutter.
Add glue in the hole and on the plugs and tap them in place with a hammer. Plane them flush and allow them to dry.
Coffee Table Cut List
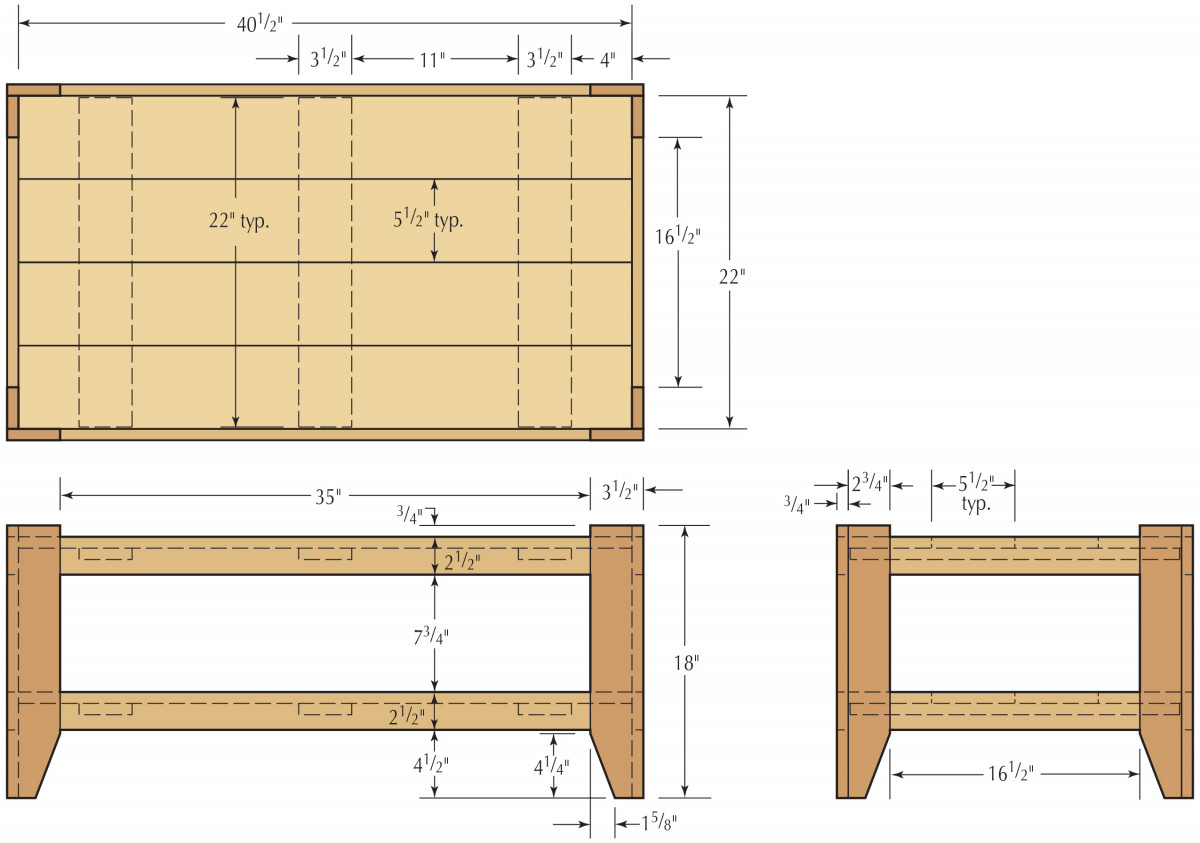
Plan, elevation, profile

Preparing for a Finish
Sand the flat surfaces with #120- and #150-grit sandpaper, and round the ends of the tops of the legs and the sharp corners. Use a file or rasp to ease the edges of the leg tops and carefully sand the areas smooth.
The staining process begins with a coat of Olympic “Special Walnut” wood stain, rubbed on heavily with a clean rag. Allow it to penetrate for about 15 minutes, then wipe away the excess. Let it dry for 24 hours.
The second coat (also ragged on and allowed to penetrate for 15 minutes) is of “Dark Walnut” Watco Danish Oil. Let this coat dry for 24 hours, too, then rag on a coat of shellac over the entire table. When the shellac is completely dry, lightly sand with #400-grit sandpaper. This will knock down any nibs left from the shellac. Finally, rub on a layer of paste wax, allow it to set and dry, then polish the surface to a warm sheen.
Here are some supplies and tools we find essential in our everyday work around the shop. We may receive a commission from sales referred by our links; however, we have carefully selected these products for their usefulness and quality.


You guys could use a few more pictures